- Glass
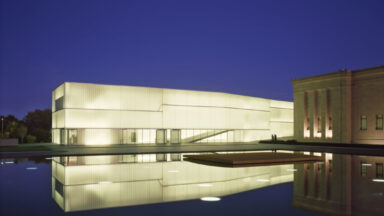
Nelson-Atkins Museum of Art | Bloch Building
The Nelson-Atkins Museum of Art introduced Bendheim’s Lamberts® channel glass to North America. It is the key design element of...Explore projectTypes
- Systems
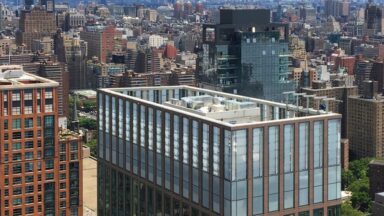
1 Hudson Yards
Ventilated glass facades can be used on low, mid, and high-rise buildings. One Hudson Yards is a residential high-rise in...Explore projectINterior
Exterior
- Projects
- Applications
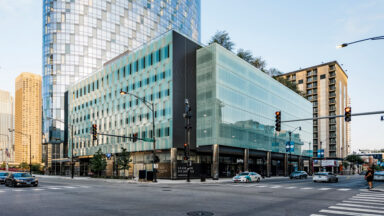
1 South Halsted / 727 West Madison Parking Structure
Bendheim’s sculptural ventilated glass facade offers superior aesthetics, air circulation, and ample daylight. The translucent glass and open-joint design create...Explore projectExterior
INterior
- Industries

1 South Wacker Marketing Suite
Eastlake Studio specified approximately 1,000 square feet of our Houdini™ micro-ribbed glass in laminated safety form for a range of...Explore projectINDUSTRIES
- Sustainability
- Resources
✖
Member Login
Become a Pro Member
Professional membership offers expanded access to premium content.
Apply For A Web AccountPremium Content Access
Please log in to download premium content. Premium downloads are available to registered members only.
Go to My AccountWe use cookies on our website to give you the most relevant experience by remembering your preferences and repeat visits. By clicking “Accept”, you consent to the use of ALL the cookies.
.
Manage consent
Privacy Overview
This website uses cookies to improve your experience while you navigate through the website. Out of these, the cookies that are categorized as necessary are stored on your browser as they are essential for the working of basic functionalities of the website. We also use third-party cookies that help us analyze and understand how you use this website. These cookies will be stored in your browser only with your consent. You also have the option to opt-out of these cookies. But opting out of some of these cookies may affect your browsing experience.
Necessary cookies are absolutely essential for the website to function properly. These cookies ensure basic functionalities and security features of the website, anonymously.
| Cookie | Duration | Description |
|---|---|---|
| cookielawinfo-checkbox-analytics | 11 months | This cookie is set by GDPR Cookie Consent plugin. The cookie is used to store the user consent for the cookies in the category "Analytics". |
| cookielawinfo-checkbox-functional | 11 months | The cookie is set by GDPR cookie consent to record the user consent for the cookies in the category "Functional". |
| cookielawinfo-checkbox-necessary | 11 months | This cookie is set by GDPR Cookie Consent plugin. The cookies is used to store the user consent for the cookies in the category "Necessary". |
| cookielawinfo-checkbox-others | 11 months | This cookie is set by GDPR Cookie Consent plugin. The cookie is used to store the user consent for the cookies in the category "Other. |
| cookielawinfo-checkbox-performance | 11 months | This cookie is set by GDPR Cookie Consent plugin. The cookie is used to store the user consent for the cookies in the category "Performance". |
| viewed_cookie_policy | 11 months | The cookie is set by the GDPR Cookie Consent plugin and is used to store whether or not user has consented to the use of cookies. It does not store any personal data. |
Functional cookies help to perform certain functionalities like sharing the content of the website on social media platforms, collect feedbacks, and other third-party features.
Performance cookies are used to understand and analyze the key performance indexes of the website which helps in delivering a better user experience for the visitors.
Analytical cookies are used to understand how visitors interact with the website. These cookies help provide information on metrics the number of visitors, bounce rate, traffic source, etc.
Advertisement cookies are used to provide visitors with relevant ads and marketing campaigns. These cookies track visitors across websites and collect information to provide customized ads.
Other uncategorized cookies are those that are being analyzed and have not been classified into a category as yet.
Powered by 